You can create and activate your online sign ups in minutes in ivolunteer.com.
Click on the Events menu. Click the Add button above the list of your events. By default, the Add button launches the New Event Wizard. If you prefer the old Event creation method, select “Classic Add” to exit the wizard. Otherwise, proceed through the Wizard.
NOTE: You’ll still be able to edit your Event settings the usual way after clicking Finish and exiting the wizard.
Adding Sign Ups with the New Event Wizard #
- The N.E.W. jumpstarts your online sign ups by letting you start from a template. On the Start step, you can optionally answer questions to narrow down your selection of a signup sheet template, or you can click Next to see all the templates and filter them by keyword.
- On the click in the search box to pull up a list of keywords to filter by. From a potluck dinner to a sports tournament or vaccine clinic, select the template that best matches your signup needs. The basic or generic templates are suitable for a wide variety of signup opportunities, so start with one of those if you don’t see one that matches your specific event.
- Click Next to step through the Wizard.

NOTE: On any step, click More Options to customize your signup sheet setup further.
- Basics Step: Name your event, enter a start date, and enter the Unique ID for the URL. Change the Unique ID to something that matches your signup opportunity. Click More Options to set terminology, signup start and end dates, and other options.
- Prompts Step: Some templates include custom prompts to collect additional information from your participants, such as a phone number. You can add, delete, or edit prompts on this step. Click More Options to control prompts visibility.
- Tasks Step: A Task Area is a flexible grouping of signup slots. The options on this step will depend on your choice of template. Click More Options to control how your tasks will display on the signup sheet.
- Click Add to make a copy of a Task Area/Group/Role or to create a new one from scratch.


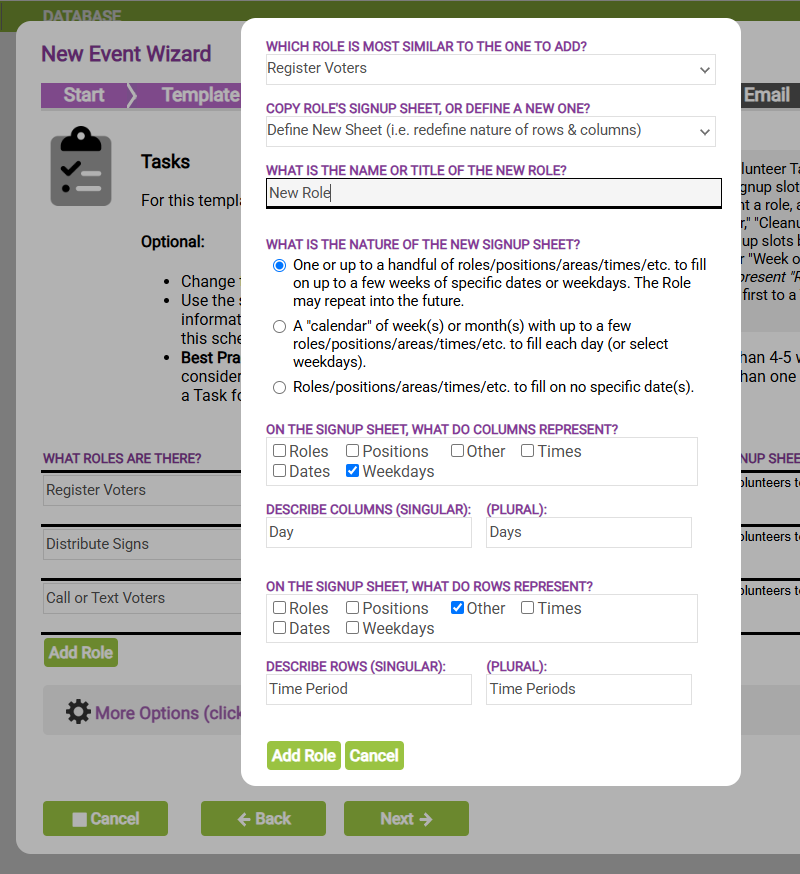
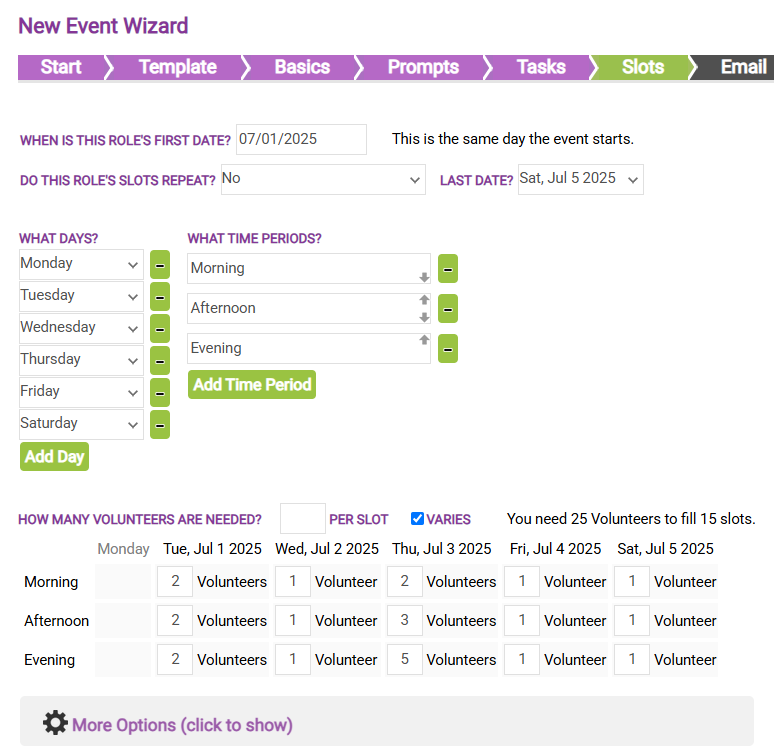
- Slots Step: A slot is a specific opening that someone can sign up for. Each Task Area can have one or many slots, depending on your template choice and requirements. Check the Varies box to vary the number of needed participants per slot. Click More Options to edit signup instructions, display, and other options.
- Email Step: In this step, you can set up and schedule custom Reminder and Thank-You emails to your volunteers.
- Done Step: All done! You can Click Back to review your choices or Finish to create the Event. Once you exit the Wizard, you will be able to edit all of your settings in tabs.
Pre-Launch Checklist #
Click here for a pre-launch checklist for your new sign up sheet.
Adding Sign Ups the Classic Way #
You can also create and edit your online sign ups the “classic” way, outside the wizard. Many settings are available to adjust.
- Click Use Classic Add in the New Event Wizard. Under Event Details & Actions > Info, enter a Name for your event, the Unique ID for the URL, the Event Start Date, Event End Date, Signup Start Date and Signup End Date. You can go back and change these fields at any time if you change your mind or if the plan for the event changes in the future.
- Change the Unique ID to something that matches the event. For example, if my event is a “Wrapping Booth,” I might want my Unique ID to be “wrap.” The Unique ID will become part of the URL or web address your volunteers will use to sign up for your event. E.g. http://myorganization.ivolunteer.com/wrap.
- Choosing the dates for your event is important to ensure that all slots, reports, and emails go out on time. Here is the link to a video on how dates work.
Please also remember to check that your time zone for the event is correct. You can do this after saving your event by going to the Settings tab and then the Date/Time tab for the Event. You also can change the default time zone for new events under Organization > Organization Settings > Date/Time.
- When you have finished putting in these details, click the OK button. You now have a new Event!
- Next, verify the Contact information on the Event Details & Actions > Info tab. This information defaults to the administrator who created the event, but you can change it to someone else.
- Also on the Info tab, verify the location of the event so that volunteers aren’t getting sent to the wrong place to volunteer!
- Click the Save button to save your changes.